Introduction to Buttons & Events in Flash (AS3)

Buttons are objects categorized as Symbols and are used to enhance user interaction. Their timeline consists of four frames or states namely Up, Over, Down, Hit which are respectively the frame to display when the button is inactive, when the user brings his mouse over it, when the user clicks it and the area in which the button should accept mouse events...

Creating a Button ::
To create a new button, select "New Symbol" from the insert menu or use the keyboard shortcut, Ctrl+F8 and choose Button as the type for the new symbol. 
Select the Up frame and draw on the stage, in a way you would like the button when idle. 
Now right click the Over frame and select "Insert KeyFrame" this should create a duplicate of the Up frame which you can edit or you could select "Insert Blank KeyFrame" if you wish to edit from scratch either way, make the Over frame reflect how you would like the button to look when the mouse moves over. 
Similarly, edit the Down frame and the Hit frame.
Note that the Hit frame is not essential for the button to function but then it's advised you use it to define the button area. This can be done by drawing a shape in the hit frame to reflect the buttons area of effect. 

Now that we are done with creating our button, we need to write some actionscript to tell the button how it need to react to Mouse Events (when a mouse moves over, mouse button is pressed, etc.).
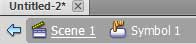
Before we do that,we need to move back to the main stage by clicking on the Scene1 link toward the top right corner of the window as show...

Now open the library (Ctrl+L) where the button we just created is listed and drag it and drop it on the stage of the main movie. This should create an instance of the button. 
Open the properties window (Ctrl+F3) and select the button on the stage. In the properties pane, change the instance name to "my_btn".

Now Select the first frame from the timeline, right click and select "Actions" this should open the actions pane where you will need to put the following code.


Code ::

my_btn.addEventListener(MouseEvent.CLICK,handleClick);

function handleClick(e:MouseEvent)
{
trace("my_btn was clicked !!!");
// code to be executed on click here
}


 Code Description ::
my_btn.addEventListener(MouseEvent.CLICK,handleClick);

In this line, we are assigning an Event Listener to the button (instance name : "my_btn") to listen to the Events Stream and call the function "handleClick" when a MouseEvent, "CLICK" is registered.
In simple words, the function is called when the user clicks the button we put on the stage.
Syntax for initializing an eventHandler :: Object.addEventListener(Event,function_name);

function handleClick(e:MouseEvent)
{
trace("my_btn was clicked !!!");
// code to be executed on click here
}

Here, we are defining a function by name handleClick which will be called when a mouse click event is registered.
Here a parameter variable, "e" of the type MouseEvent is set because the eventHandler function passes an event variable as arguments and the function needs to accept it though we dont use it in the code.


Now that you have a basic idea about using buttons and listening to events, you can extend your knowledge to different events and also edit the basic handleClick function in this tutorial and extend it for more complex operations.

Introduction to Animation in Flash :: Timeline and Tweening.

The first thing that we should we familiar with when making animations in flash is the timeline. By the end of this tutorial, you will be familiar with frames, key-frames and the timeline and will be able to create animations of objects using Tweening...
The TimeLine ::
 The timeline is that area where you will be working with layers and frames to alter the movies contents or to animate them.
It also contains info like fps, current frame and length of the movie...

Frames and KeyFrames ::
Keyframes are those frames that define the initial and final postitions of an object in an animation and the frames inbetween are filled by fillers known as frame. A keyframe is marked by a circle (frame 1 in picture) and frames are marked by rectangles...


Tweening :: (in Flash Cs4 and later)
Tweening is a technique employed in animation where intermediate frames are developed inbetween two KeyFrames to create a smooth animation, giving the appearance of the first keyframe evolving into the other.

To create our tweening animation, first launch Flash and create a new file (Ctrl+N) and select ActionScript3 from the list. This should open a new flash movie with a white stage. Now move the mouse over to the timeline and select the first frame as shown in the above picture. Now import an image that you would like to animate onto the stage. To do so select import to stage from the menu (File>Import>Import to stage) or use the shortcut Ctrl+R and select an image.

This should bring the image onto the stage. Select the image and convert it into a graphic symbol (Ctrl+F8). Nowright click on the and select "Create Motion Tween" this should create some frames for the animation as shown...

Now select the last frame and move the image in the direction you want it to move this should show a green trail if done correctly, as show in the image... Now test the movie and you should see your object animate and move. In case you want the animation to last longer or shoter, you can drag the last keyframe to the right or to the left respectively to reduce the movie time...
Now that you know how to tween postition, you can try out tweening other properties like transparency, scale, rotation or even combinations of any to create animations...This can be achieved by setting initial properties in keyframe 1 and final properties in keyframe 24.


For a more detailed description on tweening, try the article:Intro to Animation by kirupa.com

Nut and Bolts of Flash: Symbols- MovieClips, Buttons, Graphics

Before we start creating Flash content, we need to know the nuts and bolts that go into making these... In this article you will learn about some of the most commonly used objects (Symbols) and their properties. Even these Symbols are objects and hence are defined by a class with properties and functions specific to each...

Button Symbol ::
Button symbols are used to create interactive buttons. Button symbols are made up of four key-frames, also known as states and are related to user interaction and are labeled Up, Over, Down and Hit .
The Up state defines the button when the button is inactive, Over state when the mouse moves over it, Down state when the mouse button is pressed down on the button, Hit state defines the hit-area of the button or the effective button area.

MovieClip Symbol ::
Movie Clips are actual movies within a movie. These are used for animations that run independent of the main movie's Timeline. These are similar to actual flash movies and can contain Actions.

Graphic Synmol ::
Graphic Symbols are mainly used for static images that need to be re-used in a movie. They cannot contain actions or sounds. These do not play independent of the main timeline and hence playing animations through graphic symbols and syncing them would be a hassle.

You can get your hands-on by creating your own symbol. To do so, select Symbol from the insert menu (Insert > Symbol) or use the shortcut, Ctrl+F8
and the window that opens, select the symbol you wish to create. 
In case of any confusion regarding timelines and frames, try this article.. Flash TimeLine

Related Posts with Thumbnails